Open Concept Kitchen and Living Room, How to Make It Actually Work | Georgia Home Design
Open concept looks great in photos but is harder to get right than it seems. A designer's guide to zoning, furniture layout, sight lines, and the mistakes that ruin open floor plans.
Georgia
Open Concept Kitchen and Living Room, How to Make It Actually Work
Open Concept Kitchen and Living Room, How to Make It Actually Work
Open concept is the most requested layout in residential renovation. Homeowners see the light-filled, flowing spaces in magazines and real estate listings and want that feeling in their own home. And when done well, open concept delivers, it makes homes feel bigger, brighter, and more connected.
But here’s what nobody tells you: open concept is harder to design than separate rooms. Walls do a lot of work you don’t notice until they’re gone. They define spaces, contain mess, absorb sound, provide surfaces for furniture, and hide the pile of dishes from your dinner guests.
I’ve designed open concept renovations for homes across Winnipeg, everything from 1950s bungalows to modern new builds, and the difference between open concept that works and open concept that feels like one big, awkward room comes down to intentional design.
Before You Remove a Wall
The excitement of open concept often outpaces the planning. Before you call a contractor, consider these realities:
Structural Assessment
In most homes, at least some interior walls are load-bearing. Removing a load-bearing wall requires a structural beam to carry the load above. This is not optional and not DIY.
In Winnipeg homes:
- Walls running perpendicular to floor joists are often load-bearing
- Centre walls in bungalows typically support the roof structure
- Split-level and two-storey homes have more complex load paths
A structural engineer ($300–$500 for an assessment) will tell you exactly what’s possible. Budget $2,000–$8,000 for beam installation depending on the span length and load.
What You Lose
Honest assessment of what disappears when walls come down:
- Wall space for furniture placement (where does the sofa go now?)
- Sound separation (the blender, the dishwasher, and the TV all share one space)
- Visual separation (the kitchen mess is always on display)
- Electrical outlets and switches that were on the removed wall
- HVAC runs that may have passed through the wall
What You Gain
- Light circulation, natural light reaches deeper into the home
- Sight lines, you can see and interact across the space
- Perceived size, the combined space feels significantly larger than either room alone
- Social flow, cooking, eating, and living happen in one connected zone
- Resale appeal, open concept remains strongly preferred by buyers in the Canadian market
The Fundamental Principle: Define Zones Without Walls
The single biggest mistake in open concept design is treating the entire space as one room. It’s not. It’s multiple rooms that happen to share a floor and ceiling. Each zone needs its own identity while belonging to the whole.
Zone 1: The Kitchen
The kitchen zone is defined by its fixed elements, cabinetry, appliances, countertops. These don’t move. Your job is to ensure the kitchen reads as complete and intentional, not like it’s spilling into the living area.
Key strategies:
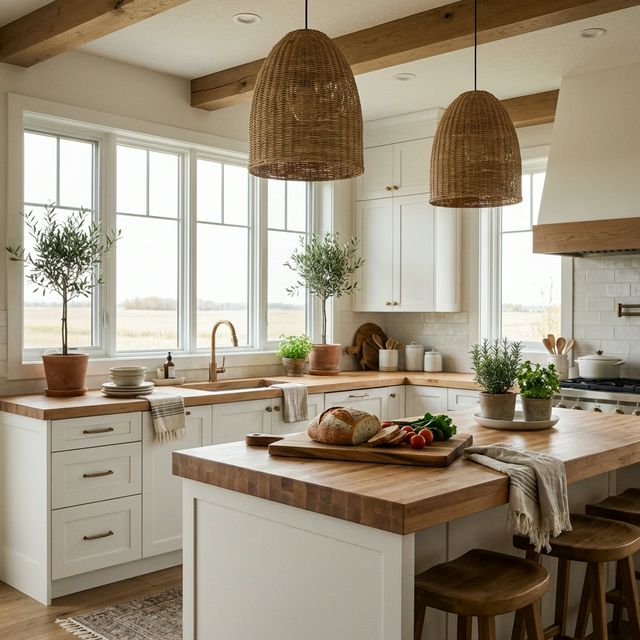
- The island as boundary. A kitchen island does double duty: it provides prep space and seating on the kitchen side, and creates a clear visual boundary between kitchen and living area. The island is the single most important piece of furniture in an open concept home.
- Consistent flooring throughout the open space (don’t change flooring at the kitchen boundary, this chops the space visually and defeats the purpose). If you want different flooring in the kitchen, transition it at a natural break point like a hallway.
- Pendant lighting over the island signals “kitchen zone” from across the room. Choose fixtures that complement but differ from the living area lighting.
- Back-of-island finish. The side of the island facing the living room is essentially a piece of living room furniture. Consider panelling, a waterfall countertop, or a contrasting material on this face. A visible sheet of raw MDF is not an acceptable finish.
Zone 2: The Dining Area
The dining zone is the bridge between kitchen and living room. It’s the transitional space that makes the open concept feel intentional rather than random.
Defining the dining zone:
- A rug under the dining table. This is the most effective zone-defining tool in open concept design. Choose a rug large enough that chairs remain on it when pulled out ($200–$500 for a quality dining rug).
- A statement light fixture centred over the table. A chandelier, a cluster of pendants, or a sculptural fixture anchors the dining zone from above.
- The table itself, choose a shape and size that creates breathing room. In a narrower open concept, a rectangular table aligned with the space flow works best. In a wider space, a round table creates its own distinct territory.
Zone 3: The Living Area
The living area needs to feel like a complete, comfortable room despite having no walls on one or more sides.
Furniture arrangement is everything:
- Float the sofa. In open concept, the sofa typically faces away from the kitchen, with its back creating a soft boundary between living and dining/kitchen zones. This is the most counterintuitive move for people used to pushing furniture against walls, and it’s the most important.
- Create a furniture “room.” Arrange seating in a conversation group, sofa, chairs, coffee table, that forms a contained space. The gap between the back of the sofa and the kitchen island (or dining table) should be 36–48 inches for comfortable traffic flow.
- Anchor with a rug. A large area rug (8x10 or 9x12 depending on your space) under the seating group defines the living zone. Front legs of all seating should be on the rug at minimum.
- Provide a focal point. Without an obvious wall, the living area needs a visual anchor, a fireplace, a large piece of art, a TV wall, or a bookcase wall. This gives the seating group something to orient toward.
Managing Sight Lines
In open concept, everything is visible from everywhere. This is both the appeal and the challenge.
The Kitchen-to-Living Room View
When you’re sitting on the sofa, what do you see when you look toward the kitchen? If the answer is a pile of dishes in the sink, a cluttered countertop, and the inside of a microwave, the open concept is working against you.
Solutions:
- Raised bar or waterfall countertop on the island (4–6 inches above counter height) hides the kitchen work surface from the living room.
- Integrated appliances (panel-ready dishwasher, cabinet-depth fridge) reduce visual clutter.
- Under-counter lighting draws the eye to the backsplash and away from the countertop surface.
- Clean countertop discipline. In an open concept home, kitchen organisation isn’t optional, it’s an interior design requirement.
The Living Room-to-Kitchen View
When you’re cooking, what do you see? Ideally: the living room arranged as a pleasant scene, and beyond it, the windows. The kitchen-facing view of your living room should be considered as deliberately as the front.
This means:
- The back of your sofa matters (no sagging, torn fabric, or pet scratches visible)
- Console tables or low shelving behind the sofa create a polished transition
- Cord management is critical, visible TV cables from the kitchen sightline ruin the open concept aesthetic
Colour and Material Continuity
Open concept spaces demand a cohesive colour palette. When everything is visible simultaneously, conflicting styles or colours create visual chaos.
The rules:
- One wall colour throughout the open space. Accent walls are possible, but use restraint, one at most, and it should be the focal wall (behind the TV or fireplace).
- Consistent trim and ceiling colour throughout.
- Consistent flooring throughout (this is non-negotiable in open concept, floor transitions kill the flow).
- Coordinated, not matching. Kitchen finishes, dining furniture, and living room pieces should belong to the same design family without being identical. Think: warm wood tones throughout, mixed but related, not all-matching like a catalogue showroom.
- One metal finish as primary (brass, black, chrome) with an optional secondary accent. Consistency in hardware, lighting, and fixtures ties the zones together.
Lighting: Three Zones Need Three Lighting Schemes
Each zone needs its own lighting layer, controllable independently. This is how you create the feeling of separate rooms without physical separation.
Kitchen Zone
- Recessed pot lights for ambient (on a dimmer)
- Under-cabinet task lighting
- Pendant fixtures over the island (decorative + task)
Dining Zone
- A statement fixture centred over the table (on a dimmer)
- Optionally, wall sconces or a buffet lamp for ambient warmth
Living Zone
- Recessed lights or a central fixture (on a dimmer)
- Table lamps and floor lamps for ambient layers
- Accent lighting (picture lights, shelf lighting) for warmth
Why dimmers matter: At 8 PM, you want the kitchen bright for cleanup, the dining area dimmed, and the living area at a warm, relaxed glow. Without independent dimming, the entire space is either fully lit (institutional) or fully dim (can’t see to cook). Dimmers are the most under-appreciated tool in open concept design.
Sound: The Hidden Problem
Noise is the number-one complaint from homeowners who’ve gone open concept. Hard surfaces (tile, countertops, hardwood) reflect sound. Appliances, conversations, and media all share one acoustic space.
Sound mitigation strategies:
- Soft furnishings. A large area rug, upholstered furniture, heavy curtains, and throw pillows absorb sound. Don’t minimise these for aesthetic reasons in an open concept.
- Ceiling treatment. If you have exposed beams or high ceilings, acoustically absorptive panels or a textured ceiling can help. For standard drywall ceilings, this is less of an issue.
- Quiet appliances. In an open concept kitchen, appliance noise is a living room problem. Invest in a dishwasher rated under 44 dB. Consider a range hood with a quiet setting.
- Soft-close everything. Cabinet doors, drawers, and toilet lids. The cumulative noise of slamming cabinets in a kitchen adjacent to a living room is surprisingly disruptive.
- Rugs, rugs, rugs. Cannot overstate this. Hard floors in an open concept without rugs create an echo chamber.
Open Concept in Small Homes
Many Winnipeg homes, especially the beloved bungalows in Crescentwood, River Heights, and Fort Rouge, are modest in size. Removing walls in a 900-square-foot bungalow to create open concept doesn’t produce the grand, sweeping space of a new build. It produces a compact, multi-function room.
Making small open concept work:
- Scale your furniture down. A 96-inch sofa in a 12x20 open concept is too much. An 80-inch apartment sofa opens up the room.
- Use a smaller island or peninsula rather than a full island if floor space is tight. You need 42 inches of clearance on all sides of an island for comfortable movement.
- Consider a partial wall. A half-wall (36–42 inches high) or a column detail where a wall was removed provides some separation and a surface for furniture without closing the space.
- Maximise vertical. In small open concepts, use wall height for storage and visual interest, tall bookcases, floor-to-ceiling curtains, vertical art arrangements.
Open Concept in Two-Storey Homes
Two-storey homes often have the kitchen and living room on the main floor with bedrooms above. Open concept on the main floor is nearly universal in new builds and increasingly common in renovated older homes.
Unique considerations:
- Staircase placement becomes a design element. An open staircase at the edge of the open concept can be a beautiful architectural feature. A closed staircase in the middle of the space can feel like a dividing wall.
- Second-floor noise travels down more easily in open concept (no ceiling barriers). Consider carpet or rugs on the second floor directly above.
- Heat rises. Open concept with a two-storey ceiling or stairwell can create temperature differences. A ceiling fan or proper HVAC zoning helps.
Common Open Concept Mistakes
- Removing every wall. Some walls serve a purpose. A small study, a mudroom, a pantry, these enclosed spaces improve daily life. Open concept is about connecting the main living spaces, not eliminating every wall in the house.
- No zone definition. One big room with scattered furniture feels like a gymnasium. Define zones deliberately.
- Mismatched styles. A farmhouse kitchen and a mid-century modern living room visible simultaneously creates visual confusion. Choose a consistent design direction.
- Ignoring the ceiling plane. When walls disappear, the ceiling becomes more prominent. Consistent ceiling height and treatment throughout the open space matters.
- Forgetting about storage. Walls hold shelves, closets, hooks, and storage systems. Open concept removes wall real estate. Plan where everything goes before removing walls.
Is Open Concept Right for Your Home?
Open concept isn’t automatically better. Consider keeping walls if:
- You work from home and need acoustic separation
- You cook frequently with strong aromas (curries, fish, stir-fry) and want to contain them
- You have young children and want to gate off the kitchen
- Your home is already spacious and doesn’t benefit from borrowed space
- You value the ability to close a door and hide a messy room before guests arrive
Consider opening up if:
- Your home feels dark and compartmentalised
- You want to see your family while cooking
- You’re selling and want to appeal to the broadest buyer pool
- Your kitchen and living room are both undersized and would benefit from shared space
Considering an open concept renovation? Georgia Home Design offers virtual consultations, I’ll help you plan a layout that’s functional, beautiful, and actually works for how you live. Book a consultation →